Building is a key component of DarkRP, and ThatDarkRPServer. You build bases to create drugs, farm printers, or just hang out with friends and see who all raids you, so having the basics of building is pretty essential. This guide will help show you the basics of building on ThatDarkRPServer, and will show you the features and functions of the ToolGun tools available to you, so lets begin.
Prop Health
One major factor that seperates ThatDarkRPServer from other servers is the custom "Prop Health System", which was recently implemented into the server. In this system props on a Management Chosen list have increased health, which can be lowered by shooting it, or using the Plasma Cutter on it. When building a base, it is key to ensure your base can withstand Plasma Cutters and gunfire, or at least defend against it long enough for you to prepare. By clicking here, you can be taken to a post explaining it more in detail.The Precision Tool
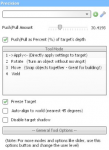
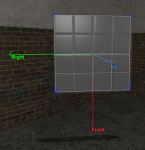
The Precision tool is used when moving props in a more delicate manner than your physgun, such as lining it up in a doorway, or pushing props into other props. When you select the Precision Tool, a menu will show up on the right side of the Q Menu, and it will display many features for you to use. The main one being the Push/Pull Amount, which is a Slider bar to choose how much your prop will move in the way you are pushing/pulling it in. In order to Push a prop, you Left Click while looking at a surface, to Pull a prop, you right click while looking at a surface.
The Weld Tool
The Weld Tool is used when preparing a base, or other type of building to be Advanced Duped, so all components of it are all saved together. In order to weld props together, you must Left Click once, selecting the fist prop, then Left Click again on the second prop, and repeating this process for all the props you have. This is important to do thoroughly to ensure you are not missing any props from your dupe.
The 3D2D Textscreen
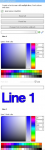
The Textscreen is used when displaying a sign infront of your base, or around the map, such as a "Building" sign, or a "Gun Shop" sign. When you select this tool, a menu will show up the same as all other tools, on the right side of the Q Menu, and display textboxes, options, colors, and a Text Size Slider. For each Line, select the Text Size, Color, Alpha, etc you want for it, then type in your text into the box below the color options. To post your Textscreen, Left Click on a wall to display it, and to update a textscreen, Right Click on it after making all the wanted changes to it in the menu.

The Advanced Duplicator 2
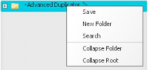
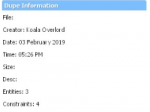
The Advanced Duplicator is used when saving a base, building, hobo building, etc so you can use it again later, without having to build it all over again. Before you use this tool, ensure all props that are apart of what you are duping, are welded together, so they will be saved with the Dupe file. To check how many props are included in the Dupe click the "Dupe Information" tab towards the bottom of the Adv Dupe menu, and check the "Entities:" line, if the number here lines up with how many props you have, then it is correct. In order to select props to save a Dupe for, Right Click on one of the Props that is Welded to all the other ones, this will create a ghost overlay of all the props selected. In order to save your dupe, Right Click on the "Advanced Duplicator 2" folder and select the "Save" option, then enter all required information. To spawn your Dupe, open the "Advanced Duplicator 2" Folder and double click on the file you want to spawn, if you want to spawn it in the same location as it was duped in, select the "Paste at Original Location" box, then Left Click to spawn your dupe and wait for it to finish.

The Button Tool
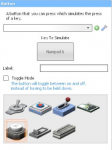
The Button Tool is used when you want to make a Fading Door open without using a keypad, instead using a button. You can make the Button toggled, which when used will keep the fading door open until the button is pressed again, or untoggle it, where the fading door will stay open until the player lets go of the button. It is important to note, the Button is not a secure way of opening the front doors of your base, as any player can use it.
The Fading Door Tool
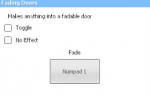
Fading Doors are the key component of basing, it is a way to use a prop as a door instead of ones that can be lockpicked opened. This also allows you to use Keypads, which are Password protected, so your "door" will have a password selected by you. You can make the Fading Doors toggled where it will stay open until you press the selected key for it again, or the normal way, where as soon as they key is let go, the door shuts.
The Keypad Tool
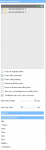
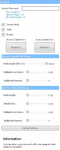
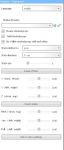
The Keypad Tool allows you to place password Protected Keypads to act as a way of opening Fading Doors, which is a secure method of protecting your base from raiders. When you select the tool to use, a menu will open, and have many options, ensure that the Hold Length is at 10, as that is the rules. After you've entered all the required information; Access Password, Access Key Granted, and Access Key Denied, you can place your keypad, and when you enter the Password on it, the door will open. Keypad crackers are vulnerable to Keypad crackers, however it is more secure than any of the other options.
The No collide Tool
This tool allows you to no collide a prop, so players can freely walk through it. This is not to be confused with a Fading Door, this is simply a prop that can be walked through. To no collide a prop, right click on the prop to no collide it, and right click on it again to collide it.
The Stacker Tool
The Stacker Tool is used to replicate props infront, behind, above, below, or beside a prop. This is useful for situations such as making walls. To use this tool, select it from the list and a menu will show up with many options, one of the key ones is the direction the prop will be stacked in, as you mouse over your prop arrows will help guide you in which direction you need to have it set to. The other useful options are X, Y, Z, Pitch, Yaw, and Roll, which manipulates the way the new prop spawns, either moving it more to the left, right, down, etc.
The Color Tool
The Color Tool is used to color props, it is quite simple to use. When selected a menu will show up, and just select the color you want from that menu, then Left Click the prop you wish to be colored.

The Material Tool
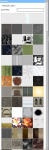
The Material Tool is used to apply materials to props, it is also quite simple to use. When selected a menu will show up, and display a long list of materials to choose from, simply choose the material you want then left click on the prop you wish to apply it to. To revert the Material, right click on the prop.
The Precision tool is used when moving props in a more delicate manner than your physgun, such as lining it up in a doorway, or pushing props into other props. When you select the Precision Tool, a menu will show up on the right side of the Q Menu, and it will display many features for you to use. The main one being the Push/Pull Amount, which is a Slider bar to choose how much your prop will move in the way you are pushing/pulling it in. In order to Push a prop, you Left Click while looking at a surface, to Pull a prop, you right click while looking at a surface.
The Weld Tool
The Weld Tool is used when preparing a base, or other type of building to be Advanced Duped, so all components of it are all saved together. In order to weld props together, you must Left Click once, selecting the fist prop, then Left Click again on the second prop, and repeating this process for all the props you have. This is important to do thoroughly to ensure you are not missing any props from your dupe.
The 3D2D Textscreen
The Textscreen is used when displaying a sign infront of your base, or around the map, such as a "Building" sign, or a "Gun Shop" sign. When you select this tool, a menu will show up the same as all other tools, on the right side of the Q Menu, and display textboxes, options, colors, and a Text Size Slider. For each Line, select the Text Size, Color, Alpha, etc you want for it, then type in your text into the box below the color options. To post your Textscreen, Left Click on a wall to display it, and to update a textscreen, Right Click on it after making all the wanted changes to it in the menu.
The Advanced Duplicator 2
The Advanced Duplicator is used when saving a base, building, hobo building, etc so you can use it again later, without having to build it all over again. Before you use this tool, ensure all props that are apart of what you are duping, are welded together, so they will be saved with the Dupe file. To check how many props are included in the Dupe click the "Dupe Information" tab towards the bottom of the Adv Dupe menu, and check the "Entities:" line, if the number here lines up with how many props you have, then it is correct. In order to select props to save a Dupe for, Right Click on one of the Props that is Welded to all the other ones, this will create a ghost overlay of all the props selected. In order to save your dupe, Right Click on the "Advanced Duplicator 2" folder and select the "Save" option, then enter all required information. To spawn your Dupe, open the "Advanced Duplicator 2" Folder and double click on the file you want to spawn, if you want to spawn it in the same location as it was duped in, select the "Paste at Original Location" box, then Left Click to spawn your dupe and wait for it to finish.
The Button Tool
The Button Tool is used when you want to make a Fading Door open without using a keypad, instead using a button. You can make the Button toggled, which when used will keep the fading door open until the button is pressed again, or untoggle it, where the fading door will stay open until the player lets go of the button. It is important to note, the Button is not a secure way of opening the front doors of your base, as any player can use it.
The Fading Door Tool
Fading Doors are the key component of basing, it is a way to use a prop as a door instead of ones that can be lockpicked opened. This also allows you to use Keypads, which are Password protected, so your "door" will have a password selected by you. You can make the Fading Doors toggled where it will stay open until you press the selected key for it again, or the normal way, where as soon as they key is let go, the door shuts.
The Keypad Tool
The Keypad Tool allows you to place password Protected Keypads to act as a way of opening Fading Doors, which is a secure method of protecting your base from raiders. When you select the tool to use, a menu will open, and have many options, ensure that the Hold Length is at 10, as that is the rules. After you've entered all the required information; Access Password, Access Key Granted, and Access Key Denied, you can place your keypad, and when you enter the Password on it, the door will open. Keypad crackers are vulnerable to Keypad crackers, however it is more secure than any of the other options.
The No collide Tool
This tool allows you to no collide a prop, so players can freely walk through it. This is not to be confused with a Fading Door, this is simply a prop that can be walked through. To no collide a prop, right click on the prop to no collide it, and right click on it again to collide it.
The Stacker Tool
The Stacker Tool is used to replicate props infront, behind, above, below, or beside a prop. This is useful for situations such as making walls. To use this tool, select it from the list and a menu will show up with many options, one of the key ones is the direction the prop will be stacked in, as you mouse over your prop arrows will help guide you in which direction you need to have it set to. The other useful options are X, Y, Z, Pitch, Yaw, and Roll, which manipulates the way the new prop spawns, either moving it more to the left, right, down, etc.
The Color Tool
The Color Tool is used to color props, it is quite simple to use. When selected a menu will show up, and just select the color you want from that menu, then Left Click the prop you wish to be colored.
The Material Tool
The Material Tool is used to apply materials to props, it is also quite simple to use. When selected a menu will show up, and display a long list of materials to choose from, simply choose the material you want then left click on the prop you wish to apply it to. To revert the Material, right click on the prop.
Last edited: